For questions relating to specific aspects of the 76 / 760 please go to the appropriate pages.
For GENERAL QUESTIONS, please go to our FAQ page:
76 / 760 FAQ.
For FUNCTIONING PROBLEMS, please go to our trouble shooting page:
76 / 760 Troubleshooting.
For INSPECTION & EXAMINATION, please go to our inspection page:
76 / 760 Inspection.
Perhaps no single aspect of the S&W 76 / MK 760 causes more problems and just plain aggravation than
the magazines.
Proper magazine fit is critical in any firearm, subguns in particular. In the
S&W 76 / MK 760 proper magazine fit seems to be especially important.
True Smith & Wesson manufactured 76s are quite uniform in the magazine well area and true Smith
manufactured magazines will fit Smith guns properly. The problems arise when one tries to use Smith
magazines in an MK or vice versa. Add to the mix Suomi M31 magazines and a real headache can be in
the making.
After Smith sold the manufacturing rights to the 76, they had no control over any changes the new owners
made. Adding to the issue is that rights were subsequently resold and then resold again. Each time a
new owner took over it seems as if (to us at least) the tolerances in the magazine well area changed.
This included not only loosening or tightening the physical dimensions of the mag well itself, but the
alignment of the magazine well to the opening in the receiver. Add in changes in the length of the upper
tongue of the magazine catch and the 'fun' really begins.
What follows is series of checks you can make and steps you can take to achieve proper fit of YOUR
magazines in YOUR gun. DO NOT expect the magazines you have fitted to your gun to properly fit and
function in another gun.
These checks can be used on just about any semi or full auto firearm.
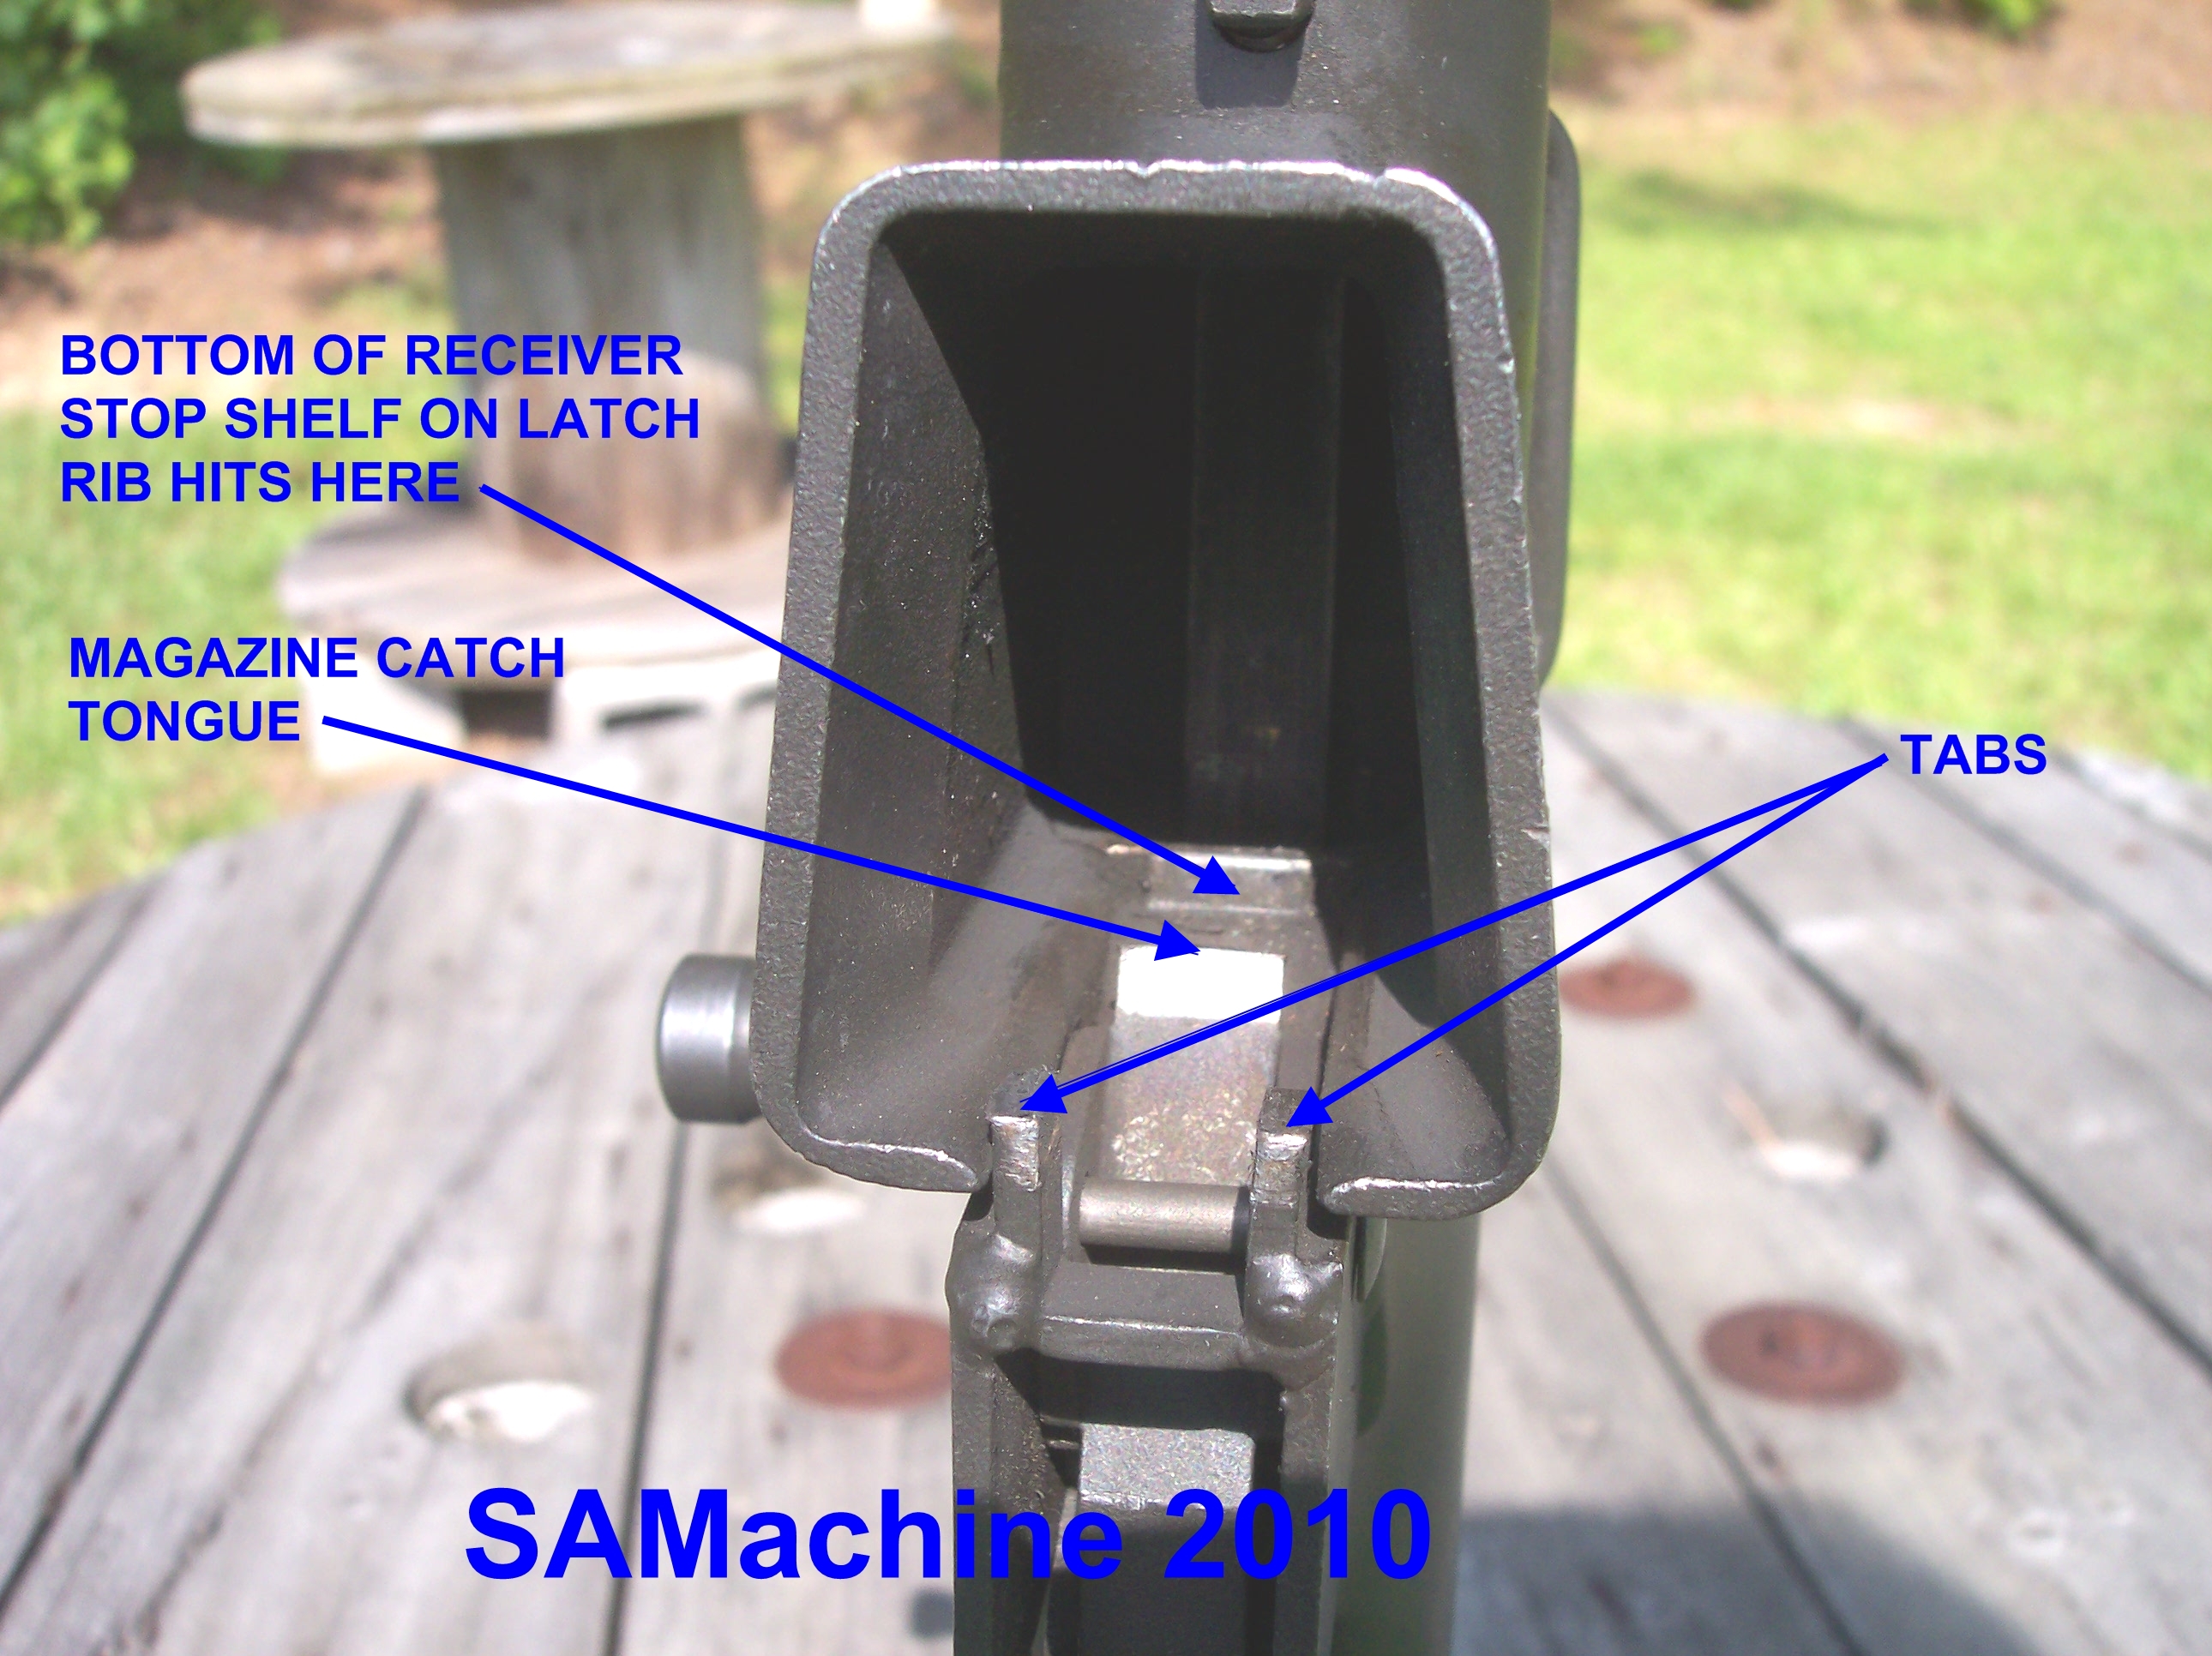
To insure that we are all on the same page, please refer to the pictures below for definitions of the
nomencalture used in this section.
Click on the images to enlarge them.

|
|
|
Latch Plate Details
|
Magazine Well Details
|
First a Quick Check:
Are the magazine lips themselves properly shaped and in
proper position?
It is all too easy for magazine lips to become distorted through rough handling or being dropped, especially
while fully loaded. The magazine shown consistantly produces
feed jams
from the right column of cartridges. This particular magazine suffers from having the right feed lip bent
inward thus overly depressing the cartridges in the right column. Properly re-forming the lip will restore
the magazine to usefulness. We have also seen magazines in which the blank was not aligned properly either
during final folding or during the welding process. Can these magazines be fixed? Maybe. Is it worth the
effort? Not in our humble opinion.
Field Expedient Technique:
Often magazine problems can be attributed to shooter technique as well as actual physical / dimensional
problems. In the S&W 76 / MK 760 the magazine serves as the front grip for the off or weak hand.
If there is too much up and down motion or rocking motion of the magazine, feed problems can be exacerbated
by the shooter pulling on the magazine to counter muzzle climb during recoil. This is an instinctive
reaction that none the less can cause a magazine to misfeed. A way around this is to allow the magazine
to "float" in the mag well. This is achieved by grasping the magazine
well and shroud with the off hand and not touching the magazine itself. This technique is a short term fix as the
shroud can be come quite warm from extended firing. This grasping technique does work and can serve to
save a shooting session in the short term and to indicate which magazines need further work in the long
term.
Now to the crux of the problem - magazine movement. If the magazine lips are symetrical and the "float"
hold has shown improvement in feeding, check the following:
Do the magazines insert fully and latch properly in the well?
Magazines should fit snugly but freely in this gun. They should slide all the way into the mag well.
Just as the top of the latch rib on the back of the magazine (which
forms a stop shelf) hits the bottom of the receiver, the latch should snap
into place. Magazines MUST insert fully and be retained by the magazine latch. If they DO NOT insert
fully and latch properly, check the following:
- Is the magazine too 'fat' - side to side dimension excessive?
- Is the magazine too 'deep' - front to back dimension excessive? This is not the magazine body
itself but is the area at the top of the magazine and includes the thickness of the wings on either
side of the latch plate rib and the thickness of the front spacer plate.
- Is the magazine stopping in the magazine well BEFORE the stop shelf on the latch rib meets the
bottom of the receiver? If so,
- Is the magazine well housing properly aligned with the opening in the bottom of the receiver?
- Is the top portion of the latch plate above the stop shelf
entering the receiver?
- Does the guide at the bottom of the latch plate on the back of the magazine pass between the
tabs at the back of the mag well? On original S&W or MK
magazines this will be the raised area at bottom of the latch
plate. SAM latch plates use a full length rib and Suomi magazines do not have any guide area at
the bottom of the latch plate. See photo comparison.
Do the magazines move up and down?
With a magazine inserted and latched into place, there should be clearance between the top of left
magazine feed lip and the bottom of the ejector. Proper clearance is normally about the
thickness of a dime and should be there with the magazine pushed into
the magazine well as far as it can go. This can be viewed with the bolt in the cocked position
(selector on SAFE) and the empty magazine being checked inserted and latched in the well.
Some slight vertical movement is permissable and in fact is needed to permit proper latching and
unlatching of the magazine. Excessive up / down movement can result in
feed jams (too low) or striking of the right rear corner
of the magazine by the bolt hood (too high).
Proper vertical positioning of the magazine is determined by the shelf at the top of the magazine latch
rib and the length of the upper tongue of the magazine catch.
Further, proper positioning is determined by the vertical location of the latch plate on the back of the
magazine body.
Corrective action:
Original Smith and MK magazine latch plates are attached by welding. They
must be removed by carefully grinding or machining away the welds without damaging either the plate or
magazine body. Re-attachment can be accomplished quite satisfactorily with lead/tin solder. However one
must make certain that the plate is properly positioned in its new location and the latch rib is parallel
with the sides of the magazine body and is centered on the back of the magazine.
The latch plates on Suomi M31 magazines are attached by spot welds between the plate and the back of the
magazine. Removal usually requires destruction of the back plate as these spot welds must be drilled or
plunge milled to remove them.
If the problem is compounded by the upper tongue of the magazine catch being too
short then the fix is either:
- Adding additional length to the magazine catch tongue. This requires removal of the magazine
catch (which is rivited into the magazine housing) then adding additional metal to the top edge of
the tongue.
- Adding additional metal to either the stop shelf (magazine too high) or the latch point on the
magazine back plate rib (magazine too low). This usually dictates the replacement of the latch plate
with a new one.
Do the magazines rock front-to-back?
The front-to-back dimension is vital in preventing rocking of the magazine in the front-to-back
direction. NO or at most minimal rocking front-to-back is CRITICAL for proper feeding. While the
length of the tabs at the back of the mag well entrance play a part
in minimizing rocking motion, there is no ready adjustment for the length of these tabs. The limiting
of rocking motion is accomplished by changing the thickness of the
front magazine pad. The thickness of the front pad effectively pushes the magazine back between the
tabs thus limiting rocking of the magazine. It also serves to push the top portion of the latch plate
above the stop shelf back against the edge of the magazine opening in the receiver.
Corrective action:
You will need a set of feeler gages available from Hardware and Automotive Supply stores. With an empty
magazine inserted and latched into place, insert a feeler gage blade
between the front magazine pad and the inside of the magazine well. Keep changing to a thicker gage until
you find one that is snug but still freely goes all the way in between the front magazine pad and the
inside of the magazine well. With the gage in place, check by trying to rock the magazine front-to-back.
There should be minimal movement. Now, while grasping the magazine in the normal manner and holding the
gage you just inserted, release the magazine catch and remove the magazine and feeler gage. They should
come out smoothly but snugly.
Cut a shim the same size as the front pad and equal in thickenss to the gage. The shim can be made from any
thin sheet metal (or layers of sheet metal just as long as the combined thickness equals the gage thickness)
or can be made from the feeler gage itself. To attach it to the front pad of the magazine, clean and
de-grease the shim(s) and the front magazine pad and attach the shim(s) with epoxy.
NOTE: most feeler gage sets can be disassembled and the gage blades used individually. This gaging
operation is more easily accomplished using individual gage blades. This operation should be performed
with each magazine due to the variability in dimensions between magazines.
Do the magazines wobble side to side?
Examine the magazine latch plate. The raised area at the bottom (OEM magazines) or the bottom portion of
the latch rib (SAM magazines) of the latch plate must fit between the two
tabs at the back of the magazine well. These tabs are at the opening of the magazine well and project
forward into the mag well. The width of the rib and the spacing between these tabs is intended to control
side-to-side movement of the magazine. The tabs should rest closely on either side of the bottom of the
raised area / latch plate rib. Often these tabs are distorted and the spacing between them can be too wide
or too narrow. Regardless of the actual width of the magazine body (as long as it is not too wide to be
fully inserted into the magazine well) these tabs, when properly adjusted to match the width of the bottom
of the latch plate, will limit the side-to-side movement of the magazine.
Excessive side-to-side movement can result in severe wear to the
right rear corner of the magazine and to the right feed lip as well. This is due to the bolt hood rubbing
on the magazine.
Corrective action:
The tabs can be adjusted in or out by gently tapping them with a hammer and flat faced pin punch. The
magazine must be kept centered. To accomplish this, move them a little bit at a time and move both of
them the same amount. When rib at the bottom of the magazine latch plate just passes freely between the
tabs, adjustment is complete.
IN CONCLUSION:
Once inserted and latched into the gun, the less the magazine moves - in any direction - the more reliable
the feeding of the cartridges from the magazine will be. Keep in mind that the Smith & Wesson 76 / MK 760
sub guns are a finicky bunch. What works well in one may or may not work at all in the next one. Trial
and error along with a good dose of patience is often the only way to get them feeding properly and
smoothly.